Tuesday, February 04, 2020

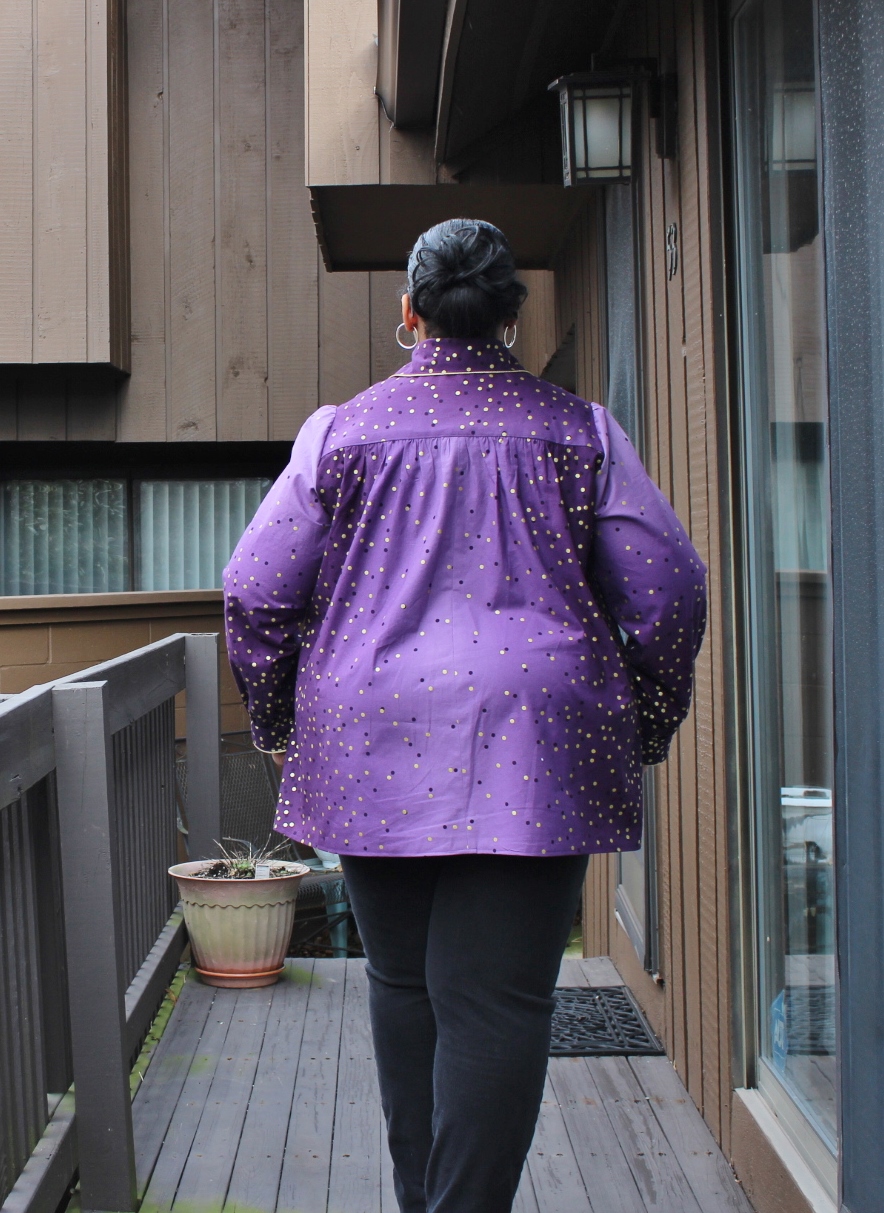
The $70 Shirt aka The Purple Reign Shirt

This shirt was another journey and a change from my original version due to fabric and cutting challenges. 


I originally bought 3 yards of an ombre purple polka dot quilting cotton back in December from Gotham Quilts.  Then I prewashed and pressed it and noticed this...


...a nice faded line through the center of the fabric which made me toss my original shirt vision out the window. I did some creative cutting and thought that maybe the shirt would work with the ombre going from side to side. Ummmm no...


This cut was just bad. Primarily because the dark to light didn't merge well and looked silly. This sent me back to the store for an additional two yards of fabric which I should have done in the first place instead of the weird cut out. I had visions of how this dress turned out bouncing around in my head. I didn't want to experience that again! In all honesty, I learned so much from making that dress, as well as, from the derision expressed on other internet sites.

That's how I came up with the title of this post.  See I've become spoiled. Most of the quilting cottons I've used in shirtmaking have been purchased from Zooks in Lancaster, PA.  The Amish have some amazing quilt stores filled with bright & vibrant fabrics but with Amish prices. The most I've spent on a quilting cotton was $9.99 per yard. I bought three yards and then another two yards from Gotham Quilts with NYC prices and tax because quilt fabric is taxed in NYC, thus a $70 shirt.

Supplies ~
5 yards quilting cotton from Gotham Quilts in NYC
11 1/2" gold dome buttons from Pacific Trimmings
Gold piping from Joyce Trimmings
Interfacing from Steinlauf & Stoeller

Construction ~
After I recut the shirt there were no additional construction changes.  There were however some design changes that added to the construction time of the shirt.

o  The shirt has been gathered into the cuff instead of using the button/buttonhole closure.  

o  Gold piping was added to the bottom of the cuff and to the collar.

o  To make the piping work best at the collar I rounded the ends slightly - so no sharp collar points on this version.

o  To get the full gathered back I had to cut the piece in half and seam it.  It uses the ombre to full effect and is a little smaller than my normal gathered back.

A Few Pictures ~


This is the fourth shirt in the series. I'm a little over half way done with the series of shirts and the cut pile. So I'm taking a break from shirtmaking here. I started a new project and that's what I'm working on now. There are a couple of cardigans that are finished plus the project referenced above coming to the blog sooner rather than later. 

...as always more later!


Saturday, February 01, 2020

A Couple of Shirts...

There is nothing new about these two shirts. I'm posting them more for me. The one thing I learned while doing the decade recap is it was great to have photos of all the things I'd made...especially since many of them no longer live in my wardrobe.

So while I did work on a new cardigan during the Holiday Break, you know I also cut out a pile of shirts. Since I use my TNT shirt patterns over and over again, the only thing that differentiates each shirt is the fabric used, buttons and any embellishments. The first shirt is made from an overprinted plaid fabric that I took the time to match the plaids while cutting it out. Though since the fabric is overprinted it really doesn't matter!

This shirt was made to go with the Simplicity Cardigan that I'm still trying to determine how to add closures to! Since there are two shirts in this blog post, I've broken it out by each shirt.

SHIRT ONE:


Materials ~
4 yds of 45" cotton & silk blend fabric purchased from Fabric Mart's brick & mortar store during March Sew Camp last year
Interfacing from Steinlauf & Stoeller
11 1/2" frosted floral buttons from the button stash

As I stated above there are no new construction techniques for this shirt. The difference is in the fabric and the way I cut it out.

Construction Info. ~
1. Front band was cut on the bias but when I added it to the shirt, I realized it didn't add anything to the shirt front. So I turned it to the back on the buttonhole side and outwards on the button side.

2. Back yoke piece was cut on the bias as was the collar, collar stand and cuffs.


3. I went with a white button to make the print pop on the shirt. Even though I did take the time to match the plaid.

4. I don't always burrito roll my shirt but for some reason I wanted to for this one. The burrito roll is still (years later) not intuitive to me. Thank goodness for this video from Sew Camp that I can refer to time and again. Also thanks to Kisha and Andrea for the help!

As an aside it's one of the things I love about Sew Camp - the sharing of techniques and learning from my fellow sewists.

A Few Pictures ~


Worn with a RTW sweatshirt hoodie


SHIRT TWO:


Materials ~
4 yards of an embroidered cotton purchased from Marcy Tilton last year
Interfacing from Steinlauf & Stoeller
11 1/2" Mother of Pearl Buttons from the button collection

Construction ~
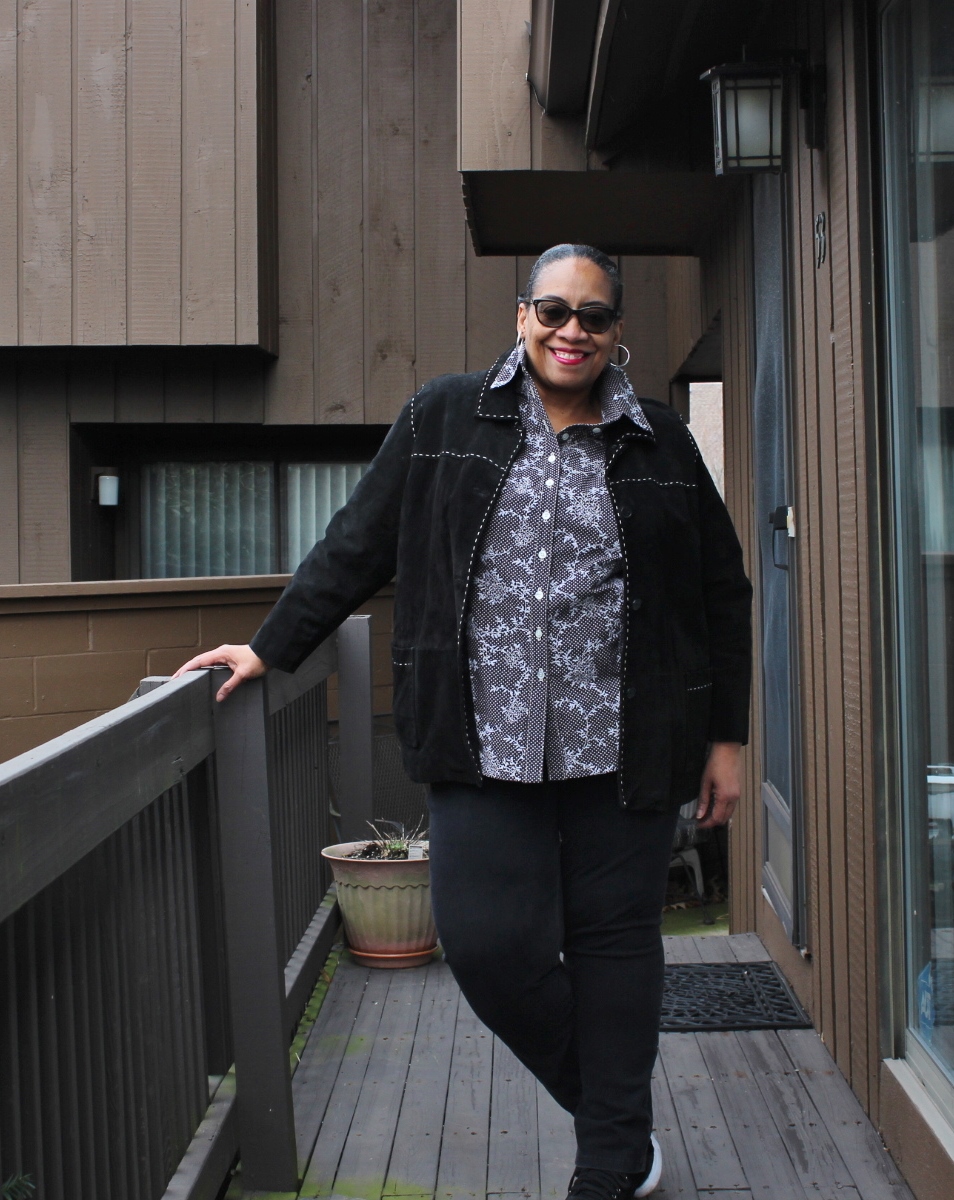
When I purchased this fabric I knew I wanted to cut the collar, collar stand, front button placket and cuffs from the unembroidered portion of the fabric.  The pictures on Marcy's site were so good, I could see that part before I purchased the fabric.

Other than creative cutting there are no additional construction techniques for this shirt.

A Few Pictures ~


Worn with a RTW suede jacket that's been in my closet for ages...


This was shirt two and three of the shirts I've recently completed. Both of these are made using the princess seam back version of my TNT shirt pattern. Both are like basics in my wardrobe even though they have a print on them. Both will go into the rotation right away especially since this seems like it will be a mild winter here in the tri-state area.

...as always more later!


Wednesday, January 29, 2020

Week in Review - Week Three

Yes, I finally put the buttons and buttonholes on the shirts and had some pictures taken.  The first shirt has already come to the blog.  The others will follow shortly.


I don't know why it takes me so long to make the buttonholes because it's not like I hand sew them. Or that my sewing machine doesn't make excellent buttonholes...I was just being lazy about it. But it's done now so next...

I also worked some more on Simplicity 8687 ~


...continuing on with my winter sewing. I haven't made a topper yet this winter and I wanted something a little unstructured and more top like. So far this is fitting the bill.

oooooooooo

I ordered Fabric last week and it arrived over the weekend. Five yards of this ltwt. polyester bubble crepe print. It was the deal of the day for $1.99 a yard from Fabric Mart. Even with shipping added for one piece, it made it $4 per yard. Still a great value. I want to use this fabric for a summer maxi dress. I may end up sewing it sooner rather than later. I want to wear it when the weather starts to turn warm instead of sewing it once the warm weather arrives.


Fabric In/Out Totals ~
I was restrained with fabric buying this month. Only purchasing this five yards plus 2 additional ones to finish the Purple Reign Shirt. Since all of the shirts I made were from the cut pile I assembled in December, my fabric out number is small.  

Just 3.5 yards - one yard for the Purple Reign Shirt and 2.5 yards for my next project. So 3.5 yards more in than out. I hope to do better next month.

I will still be using this fabric designation for tagging makes:
#deepstash - been in the collection more than 8 years
new - been in the stash less than 6 months 
collection - 1 to 7 years in the collection

Last year this time I bought 39 yards of fabric so I'd say I'm winning by only buying 7 yards this month with two of those yards needed to complete a garment.

I did complete 4 garments this month so at least there is that!

oooooooooo

In Sewing Community News this week, did you hear about the dust up with Tessuti Fabrics and the plus size sewing community?  Tessuti offered a pretty new skirt pattern that didn't have extended sizing. The plus size sewing community especially in Australia was upset because Tessuti has been promising to extend their sizing and it wasn't reflected in this pattern.

Here is what Tessuti had to say about their decision.


So what do I think?  I'd actually stopped purchasing fabric (yes I try to buy from everyone who sells fabric) when they extended some of their patterns but only had pdfs and a few hard copies to purchase. The shipping was a little expensive for a single pattern, so I walked away. There are other fabric stores in the US and pattern companies willing to make designs in my size that I don't need to chase an international company.

However, if this is the fabric store where you shop locally, I can see how you, as a plus size sewist is challenged by the situation. I understand why telling you that you should shop elsewhere for your pattern needs but oh don't stop buying our fabric is both annoying and an issue. I also understand why you don't want to give them any more of your money. Obviously, they don't believe they need your money to survive. Even more so, I understand how this hurts you.

What I really liked about the discussion, because I read ALL of the comments on both of Tessuti's and Sewverymuch's posts, was the support of sewists who could wear the patterns yet were standing with their plus size sewists. Here's the thing, I strongly believe that if a retailer doesn't cater to you, you should not spend your hard earned dollars there. If they believe they can survive and thrive without you buying fabric and/or patterns from them, then refuse to do so.

I'm a huge Lizzo fan and loved the interview she gave with Gayle King for her Grammy Special. When Gayle asked her why she wasn't on Twitter anymore Lizzo said that she doesn't go places where she's not wanted.  That's how I feel about pattern makers who don't want to extend their sizes. It is their right to run their business as they see fit, just like it's mine not to purchase their products or promote them.

So thoughts...cause y'all know I love a good discussion about what's going on in the sewing community.

Another shirt will be up next...

...as always more later!


Sunday, January 26, 2020

The Angel Shirt Finished

Here is the completed shirt ~


Let's start with a few details.  I purchased 3 yards of extra wide cotton sheeting from Fashion Fabrics Club back in November. The print on the fabric is what intrigued me and even though it was sheeting fabric, I thought it would make a great shirt.

This is one of the reasons I like shirtmaking so much! You can use such a wide variety of fabrics to make one. I also have to admit that this one has been challenging right from the get go. I've had to make more adjustments, changes to my vision and purchasing new supplies to get to this point.

Supplies ~
11 1/2" red 4 hole buttons from Pacific Trimming
Red bias binding from Pacific Trimming
Interfacing from Steinlauf & Stoeller

Construction ~
This shirt is all about how I used this interesting print to make a wearable shirt.

A couple of things:

o  This fabric is a little heavier than regular cotton fabric. At first that threw me because I was expecting a softer, lighter hand. Then I realized it made a good layer for a winter shirt since it has a little heft to it.

o  While I fussy cut this to make the most of the print, I did face some obstacles.  The first was when the fronts didn't match. The second was when the original cut out collar did not match the front of the shirt.


Here is how I fixed it:

- I didn't have any scraps long enough with the roses on it to cut another collar which is the theme of this shirt.

- But I did have scrap pieces with roses on them. I decided to attach the scraps to the front of the collar.


- I was concerned that attaching the scraps to the collar would leave one edge exposed. So I looked around the sewing cave to see what I had onhand to cover the edge. I found some rick rack that worked but it really wasn't the look I wanted.


- For the red bias binding and buttons, I headed to Pacific Trimming. I threw my original vision for the shirt out and moved in another direction.

- I added the bias binding to the collar with two rows of stitching on either side of the bias binding.  Before I sewed the two collar pieces together then assembled the collar as usual.


I really wanted the red roses to work together on the front of the shirt and complete the look.  To me embellishments should be in an odd number - it looks better to me. So I added the red bias binding not only to the collar but to the cuffs and the red buttons down the front of the shirt. These changes really made the red in the roses pop.


Other than that there were no additional changes to the construction. Though I do need to make a few statements about my shirtmaking again...

1. I do not use french seams.  My seams are sewn and serged.

2. I have two versions of this shirt, one with princess seam back & yoke and the other with a yoke and a full gathered back. This is a gathered back version.

3. Sometimes I burrito the yoke, sometimes I use another method. I didn't burrito for this version.

4. I don't use the placket on the sleeve for cuffs. I use the continuous lap method.

5. Sometimes I use button cuffs and sometimes I use the sleeves sewn into a closed cuff.

A Few Pictures ~


The wind was blowing softly while I was taking these...
that's why the shirt looks so full.

I sew these shirts like I feel at the moment or like I feel the fabric deserves. I'm not about using a bunch a techniques for techniques sake. I kind of use what I want when I want because my sewing is now about the journey...and of course the fabric!

I made quite a few shirts over the last couple of weeks to replace shirts I'd given away, grown out of or worn out.  My goal is to add 6-7 more shirts to my wardrobe this winter and to use some of the interesting fabric I've collected.

...as always more later!


Wednesday, January 22, 2020

A Week in Review - Week Two

I've gotten a lot of sewing done in the last couple of weeks.  It's probably the only thing I love about January, February and March - the extra days off and the time to wallow in my sewing.  I pretty much hate everything else about those months! LOL!

This week I want to talk about the almost finished projects in the sewing room.  I have four shirts - all hemmed just waiting for buttons & buttonholes. All buttons in the pictures below are pinned on. 

The Brownish/Black Embroidered Shirt

The Angel Shirt

The Purple Reign Polka Dot Shirt


A cardigan that I'm still trying to figure out closures for...

Simplicity 8992

...and with all of that waiting to be finished, what do I do?  I start a new project after I said that I was going to sew something simple. This is not a simple project!


Buttons from Pacific Trimmings

So this upcoming weekend will be dedicated to finishing everything. And if the weather is okay, maybe a few pictures.

oooooooooo

Like I said I started a new project Sunday evening. It's been awhile since I've used a new pattern and there was a mix of emotions when I pulled that neatly folded pattern paper from the envelope. Some excitement regarding the new sewing journey, a little dread because I knew I would need to make some pattern alterations and a feeling of ahhhh. You know that feeling of calm that comes over you because SEWING! Do you experience that when you start working with a new pattern?  Which brings me to the next thing...

ooooooooooo

The Big4 - Simplicity, Butterick, McCalls and Vogue Patterns have been sold AGAIN.  I found out on social media...

c/o of syreetabriana's IG Account

c/o dressmakingdebacles IG Account

Then a follower (thanks Renata!) sent me a link to the article here. Take a read because it's an interesting article and let me know what you think. I tend to agree with Abby about the fate of the Big4.

That's Week Two in Review - a progress report and a discussion of news in the sewing community.


...as always more later!


Monday, January 20, 2020

Updating My 2019 Goals in 2020

Let's review my 2019 Goals which I posted about on January 19, 2019 ~

1. Sew Purposefully

2. Sew at least 10 garments from deep stash.

3. Donate more fabric

4. Buy fabric purposefully

5. Use some new patterns

6. Continue to track fabric in/out and blog new fabric purchases

7. Search the fabric and notions collections first

8. Move/Reorg fabric

9. Don't fall for the Big4 Pattern Sales

10. Create an Art to Wear piece

I would say that I did well with some of these goals, some are still in progress and I'm not sure about one.  

o  I did try to sew purposefully. I had several lists that I worked from and scratched garments made off of them so my sewing definitely had direction last year.  GOAL COMPLETED.

o  I did give away/donate fabric last year. While I didn't donate to a school, I did give large amounts of fabric away to a couple of sewing friends. GOAL COMPLETED.

o  Nine garments were made from deep stash fabric last year


    - The Wool Jersey Pembroke
    - The Circle Border Print Shirt
    - Dover Jacket in Flocked Glen Plaid
    - Silk Twill Printed Shirt
    - Eyelet Cardigan - Simplicity 8059
    - Rayon Knit Pembroke
    - Black Evening Maxi - Deer 'n Doe Myosotis
    - 30 year old Holyoke Skirt
    - Marimekko Maxidress

That actually wasn't bad and I'm pretty proud that I used so much deep stash fabric though going forward I'd like this not to be a goal. I'd like to be sewing only fabric from the collection and not adding so much more. GOAL COMPLETED.

o  Eleven new patterns were used, four of which were Indie Patterns. I feel like I used more Indie Patterns this year than any other year. My favorites being the Deer 'n Doe Myosotis, Cashmerette Patterns (Pembroke & Holyoke) and Blue Dot Patterns. These patterns were used multiple times this year. GOAL COMPLETED.

o  Continue to track fabric in and out - I did this consistently, learning much about my lack of control with fabric buying. GOAL COMPLETED

o  Limit my fabric purchases - I failed miserably at this.
    My 2019 year end totals were:
    Yards In:   319.5 (way too much yardage in)
    Yards Out: 259.25 (not enough yardage out)
    Difference:  60.25 yds (I can feel all of these yards in the sewing cave)

My goal this year is to bring the yards in total way down. I NEED to! I have so many treasures in the sewing cave that are sitting patiently waiting their turn to be used.

o  When making shirts, I definitely checked my button and trim collections first. I only purchased notions when needed this year so I definitely fulfilled this and will be carrying it forward into 2020. GOAL COMPLETED.

o  I haven't bought a Big4 pattern since August 2019. I actually find myself wanting to sew some more of the indie paper patterns, work with my TNT patterns and use some of the hundreds of patterns that I've already acquired. I'm over the Big 4 with the constant cycles, the social media push to only sew the latest and greatest especially when older sewists have been supporting them for years. GOAL COMPLETED.

o  Create an Art to Wear Piece - while I don't think I did an actual Wearable Art piece I do think I'm on my way.  


This shirt is my jump off point and I want to use more interesting fabrics in my regular garments going forward.

o  Lastly I haven't reorganized the sewing cave yet.  But I'm working on it and it will happen before 2020 ends. I need storage space and a redo of the cave will give me that.

oooooo

I wrote several political posts last year and I will be writing more in 2020 as the mood strikes.  However, today is the day we celebrate the birth of Dr. Martin Luther King, Jr. in the US and even though I've written yearly posts about this celebration, I just can't this year.

I feel like America is so fractured right now.  That our politicians are failing not only the people of the United States but the Constitution which they're sworn to uphold. An impeached president sits in one of the highest branches of government and instead of realizing the seriousness of the situation, he continues to tweet, mock, and lie while almost taking the nation to the brink of war. I just don't feel like a quote is enough to reach those who believe differently than I do. 

However, this quote appeared in The Washington Post article "Black Americans are deeply pessimistic about the country under Trump..."

Francine Cartwright, a 44-year-old mother of three from Moorestown, N.J., said the ascent of Trump has altered the way she thinks about the white people in her life.

“If I’m in a room with white women, I know that 50 percent of them voted for Trump and they believe in his ideas,” said Cartwright, a university researcher. “I look at them and think, ‘How do you see me? What is my humanity to you?’ ”

This struck me because actually 53% of white women voted for 45. I didn't use to wonder about this but I think about this all the time too...even in sewing situations.  Sad right?  But that is what this administration has brought us to...

So no wonderful quote from Dr. Martin Luther King, Jr. today. Just a plea to every American to vote. If you live in a state that disenfranchises black & brown people, make sure that your voter registration is correct and up-to-date.  Make sure that you have the proper documentation to vote. Realize that it might take you longer or you'll have to make more of an effort to vote than your white neighbor.  We're a year out.  Do it now.  Don't wait! Voting is our right!  Don't forsake it and don't willingly give it away! 

VOTE like your life depends on it because it just might!

...as always more later!


Thursday, January 16, 2020

A Week In Review - Week One

I'm starting a weekly review of things that are floating around in my mind. These are all sewing related but are not enough of a thought to generate a blog post. I plan on doing these midweek so they will encompass the previous weekend and what I want to accomplish the next weekend. 

~ Status of Projects
I'm still in the middle of making shirts. It's finally projected to get cold here after days of 50 degree weather. Last weekend it was near 70 degrees all weekend and now snow is projected for the MLK Holiday Weekend. Shirts work in all of the temperatures I've been experiencing lately.

The blue/black plaid batik shirt just needs buttons/buttonholes and hems. The brownish/black embroidered one is in the same state. So what do I do?  Do I finish them?  No...I moved onto the next shirt in the cut pile! This is where I am with it now...


The two in the back are waiting for buttons & buttonholes and of course you know the saga of fixing the middle shirt. So nothing is completed yet and ready to share.

~ New Fabric
Before the year ended I bought a couple of yards of fabric from Fabric Mart, a blue/black/white boucle and a black guipure lace. Both were purchased for ideas that have been percolating in the back of my brain for awhile. 


The black will be a black lace shirt and the boucle will become a vest. Each have been paired with a pattern and now I just need to add them to the cut pile. It's 7 yards of fabric that were rolled into last month/year's totals.

I'm trying hard not to purchase more fabric...truthfully I just don't feel like adding more to what's already here. I'm feeling overwhelmed at having to remove several shelves of fabric to move it around and update the sewing cave. I hate to move. This is feeling a lot like moving!

~ Sewing Retreats/Sew Camp
I know I've gone on and on about the Sew Camps at Carriage Corner B&B and you know I love attending them.  Here is the listing of the Sew Camps for 2020.


I'm only attending the September Sew Camp and unfortunately that one is sold out. I know there are plenty of spots in the February one, only a few left in the April one, and quite a few left in the June sew camp. I mean if you're interested!


I am, however, attending the Sewing Retreat at Urban Sewciety on Saturday, February 8th and Sunday, February 9th. There are still spots available to attend this retreat so if you're interested, check it out. There will be another blog post soon about what I'm taking with me to work on.

Miscellaneous
o I have a bag under my serger to collect the clippings, bought it years ago from Nancy's Notions. I empty that bag about 2-3 times a year. It's always interesting to turn it upside down in the garbage bag because it allows me to reminisce about all of the garments I've made recently.


The last time I emptied the bag must have been in the spring because scraps of all my summer maxis are in there.

o  My sewjo is back in full effect because I want to sew all the things! I touch a fabric, see a garment and I want to make it! I've added a few more garments to cut out to go in the cut pile.

o  Have you read Bunny's last post on Blogging?  Bunny has been writing these thought provoking pieces on different aspects of the sewing community for the last couple of months. I hope you read not only that post but some of her others too.

o  One more this one from Heather from Closet Case Patterns on Quality Sewing is a must read also.  From beginner to advanced sewist, we can all sew with intent using the best techniques we know yet striving to learn more. I know there are things I could learn or practice and do better.  So I hope you will check this one out too!


Hopefully this will become a regular feature. I will try to post a Question of the Day every month because I like the discussions that ensue. Also I learn quite a bit in the comments section, too.

...as always more later!

Sunday, January 12, 2020

The Angel Shirt - Construction Details

Continuing in my quest to own more shirts, I bought this fabric last November.  I saw it in an email ad from Fashions Fabrics Club and I loved the "Florentine Romantic" air of it.  Now before y'all start, I don't know if that's what it really is.  It's just what I'm calling it, okay?!

I used my full back version of my TNT shirt so I didn't have to cut the pattern up too much. As it is, it took some consideration to get the fronts cut in a way I liked. I did end up mirroring the print on the sides. When I laid it out, it looked like the angels formed a bib on the front and I really liked that!  

The construction went together like normal. I chose not to use the burrito method for this shirt and to topstitch the shoulder seams down to the back yoke instead. Boy am I glad I went this way! Because after sewing the shoulder and side seams together I got this...


Can you say pissed off! I posted it to Instagram and got a bunch of suggestions. There were two that really resonated with me.

1. Adding a solid color front placket
Although I couldn't decide how many pieces to recut in the solid color.  Front placket, collar, undercollar & cuffs?  Or just the front placket, collar and undercollar? And the thought of adding a red color (because that's what I had on hand that coordinated) messed with my finish version of the shirt.

2. Recut the front pieces so they'd match
Since this was cut tunic length I could lose some length at the bottom without affecting the length of the shirt too much. I went with option number two.  

To make it work I did the following ~

o Recut the piece that annoyed me after matching it to the opposite front to insure the motifs worked at the center front.

Making it match up

Yes, originally I added some extra to the 
side seams to give the shirt a looser fit

Using my ruler to make sure both pieces matched in the front

o  I recut the front neckline and shoulder and sewed the front placket piece and side bodice together.  Then I realized I'd shortened the armhole by making that adjustment.


o To fix the armhole, I recut the piece by placing both front pieces on top of each other. Then I cut the altered piece's armhole to match the unaltered piece. This insured that the armhole was fixed correctly.

I was going to use the pattern piece to fix the armhole at first

Instead I laid one front on top of the other 
and cut the armhole out that way

o  Then I cut the extra off the bottom of the shirt front.

I laid everything on the cutting/sewing table one more time and checked to insure the motifs matched on the front.  Then I sewed it together.

Here is how it looks now - front and back views...

I really like how the motifs form a bib look!

Full gathered back to take advantage of the pattern

I have to admit that this slowed down the construction of the shirt considerably. I was hoping to have it to the point where it only needed buttons & buttonholes like the other two shirts that preceded it. Alas it was not to be but I am glad it was an easy fix. I'm also thrilled that I only needed to rip out the shoulder & side seams and one front piece to make it work.

Since this was a unique fix to an interesting challenge, I decided to document the process separately from the actual shirt reveal which will probably be later this month.

...as always more later!


LinkWithin

Related Posts with Thumbnails