
 Or as a subtitle, "My Version of a Chanel Dress"
I was inspired to make this dress by a picture I saw of Cameron Diaz wearing this Chanel dress in last week's People magazine as well as the July 2007 issue of InStyle Magazine. It was the details in this dress that intrigued me. I loved the yoked neckline, the pleats on the bodice and the band at the empire waistline.
Usually I see a garment and look for a pattern to duplicate the look. But this time to my amazement, there was something about this dress that encouraged me to use my TNT dress pattern as my starting point. I actually spent the better part of my bus ride home, reconstructing the dress in my mind and figuring out how to make the elements that excited me about the dress. Then I mentally toured my fabric collection, searching for just the right piece of pink fabric. Happily realizing that I had a wonderful 5 yard piece of woven silk in a light pink that I purchased several years ago from Vogue Fabrics at a Sewing Expo in Worcester, Mass.
First the steps I used to change my TNT pattern:
 1. Since my TNT pattern has already been cut into a bodice and skirt pieces for the front and back, I just made a copy of both front and back bodice pieces to use as my starting point.
2. Then I measured off a 2" yoke on both the front and back bodice pieces using a compass. You would think that I would use a french curve or some other curved measuring tool but I have always liked using a simple compass to create curved pieces. A 5/8" seam allowance was added to the bottom of both yoke pieces.
3. A 5/8" seam allowance was added to the new curved front & back bodice piece.
4. I made a 2" wide sleeve band with a 5/8" seam allowance for the bottom of the sleeve. I folded back 1" on the sleeve pattern. Why did I only fold back 1 inch? Well a 1 inch hem allowance was included and I didn't want to lose it. I don't know if this will work yet but I am working my way through this - that's why I titled the post the building of a dress.
5. Made a 2" waistband piece for both the skirt front and the skirt back pieces. I added 5/8" seam allowances to the top and bottom portion of the waistband pieces.
Now, I need to stop here and say that these are my fiddlings and shouldn't be taken as gospel. I am just explaining what I did to "build the dress that I saw in my head!" I do not think of myself as the best teacher or instructor and I really appreciate the people who can give great straightforward instructions on how to construct a garment because it sure ain't me! *LOL*
One of the most intriguing parts of the dress to me were the pleats on the bodice. And it took a lot of "thinking time" to figure out what would work best for me! Here is what I finally worked out:

1. I cut a 1/2 yard of fabric from my main piece. This piece of fabric was about 6 inches longer than my front bodice pattern piece was on the top and the bottom.
2. Then I marked 2.5 inches from my center front. I literally put the ruler down on the fabric and using a fabric marker placed a notch at the top of the fabric on one side of 2.5 and another notch at zero.

3. From those notches I measured 2 inches out for 10 inches, leaving a notched mark, every 2 inches on both sides of the original mark and on the top and bottom of the fabric piece. Clear as mud right?! *smile*
4. I pressed the pleats down - leaving the 2.5 inch center piece and then folding the notches back to meet each other at every 2 inch mark. Hope the pictures are better at explaining what I am so obviously lacking! *smile*
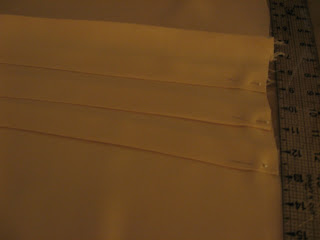
5. Pressed the pleats down and then topstitched the pleats 3/8ths from the pleated edge. I decided to topstitch them because I have a little more bosom than Cameron Diaz and I didn't want the pleats flopping open. Stitched down they lay flat but give the detail I desired. I don't know if the pleats are stitched down or not on the original dress because I couldn't find a close up shot of the bodice front that allowed me to see that amount of detailing.
6. The topstitching is done in small stitches because I didn't want it to be an obvious feature of the dress especially since there will be so much topstitching on this dress.
7. I also added the bust darts that I normally have in this dress. Again this was a feature that I couldn't see in the pictures so I went with what worked well for me.
After getting the pleated front made, I added the waistband to the bottom of the bodice top and then I carefully added the yoked piece. I was worried about my calculations but the yoked piece went on beautifully.

I was ambivalent about adding a lining to the dress. My original thought was just to double up the yoked pieces and leave the dress unlined. But after holding it up to the light, I realized that I would be able to see through the dress and after all of this work, I didn't want that to take away from the dress. So I cut a piece of lining from the bodice top with the yoke and waistband added and then a piece of lining from the skirt bottom.
All through the process of constructing this dress it has felt like I was building it layer upon layer. When I start a garment, I usually lay out all of my pattern pieces on the fabric and cut them all out at one time. Then I make any markings that I need to the garment. Add interfacing where it is needed and finally take all of the pieces to the serger where I serge finish all of the pieces before beginning construction. However, the process for this dress has been to cut out pieces and do the markings as I need them. It is probably a wasteful use of the fabric but there is more than enough and I need to be able to see how each piece fits together rather than have a whole bunch of pieces cut out and working from there.
The last part of this installment is adding the skirt front to the bodice front. I folded down 2 inches on the top of the skirt pattern and added 1.5 inches to the hem. I added some to the hem because I was worried that the dress might be too short. I can always cut that off the hem later but I would rather be safe than sorry. I attached the front skirt to the front bodice and topstitched the waistband. Here is where I am so far:

I like this! It has turned out better than I thought it would and by using my TNT dress pattern, I can hold the front up to me in the mirror and see that I don't have any fitting issues.
Tomorrow - Part 2 and the finish, 'cause I just can't drag anything out!

I love the colour you have chosen. This is going to look so beautiful - I'll definitely be tuning in for part 2!
ReplyDeleteSo this dress pushed aside the pants suits????
ReplyDeleteWell I think this dress will be more fun. And your instructions are very clear! Looking forward to part 2 (and the finish).
That's nice! Can't wait to see the finished project.
ReplyDeleteIs it odd that I'm going to say that this is exciting stuff? Seriously. I've always wondered how people altered patterns to get what they want. This is great.
ReplyDeleteI'm delurking to say that I am loving watching the process of the dress going from Cameron Diaz to magazine pic to your head to your new dress! It looks to me like she has her hand in a pocket on the front of the dress - a kangaroo pocket? I think it looks like a very cute feature. I hope you are adding this too. Anyway it's all looking great - hurry and finish so we can see :) Jen
ReplyDeleteJen - sorry no pockets! I don't have Cameron Diaz' flat stomach and those pockets would just call attention to mine! *LOL*
ReplyDeleteIt's looking pretty good so far!
ReplyDeletevery nice, those pleated front dresses are all the rage right now, I love that you altering your tnt instead of looking for a pattern that suits it.
ReplyDeleteOoooh, I'm lovin' that! I can't wait to see the final version!
ReplyDeleteCan't wait to see it finished! Love those pleats!
ReplyDeleteThe dress looks awsome so far! Can't wait to see it finished.
ReplyDeleteI love how you can take a dress and do so many things with it. You are so inspiring. Thanks for showing us how to use our TNT's better
ReplyDeleteShorty
I love it all - love the colour, love the design, love the design process, and am loving the outcome! Can't wait for the final reveal!!
ReplyDeleteTumblina
Thanks for opening my eyes to new ways to do things-the pictures make it work.
ReplyDeleteGoing to be a pretty dress!
It's beautiful! What a fantastic job. Can't wait to see the finished dress!
ReplyDeleteYou are an inspiration, indeed. Great dress.
ReplyDeleteTNT+stashed fabric to replicate what you like about a RTW dress - priceless.
ReplyDeleteI notice that you decided to stick with the set in sleeve line rather than convert to a raglan. Are you splitting the sleeve vertically from the shoulder? Could be interesting with topstitching.
Totally beautiful... fantastic color and design. I really enjoyed the design process... will stay tuned.
ReplyDeleteI love it! I think this is a perfect example of the reason I (and probably many others) sew... the ability to take something like this and duplicate, yet create your own version. Can't wait to see the rest!
ReplyDeleteYou really know how to get the most out of a pattern. I'm impressed! Can't wait for Chapter 2 and the finished product.
ReplyDeleteThis is beautiful already. I love the way you're building it, piece by perfect piece. Can't wait to see the fab finish!
ReplyDelete