I bought the Vintage Vogue Pattern from Lanetz Living in a size that I can't wear because I was so intrigued with the faux welt pockets. After getting the pattern home and reading the directions I realized that it was a very easy technique and something that I could appropriate and add to another pattern.
So to get the look I wanted, I took one TNT jacket pattern (OOP Vogue 2285), added a great instruction sheet from a vintage pattern, used several days to sew, had a spirit of adventure and got a wonderfully different jacket.
As the title states, I am going to share with you how I made the faux welt pockets. This is where the sense of adventure, the instruction sheet and a willingness to cut up a TNT pattern comes into play!
1. Pattern Alteration
First, I used the original jacket front piece. I altered this piece several jackets back so that it would have a cardigan type front. To emulate the vintage pattern, it required the high neckline so the original piece was my starting point.

Next, I cut the pattern apart. To get the same seaming detail, I laid the vintage pattern pieces on top of my original jacket piece. Drew a line across the pattern and cut. Then I added a 5/8" seam allowance to both sides of the pattern piece.

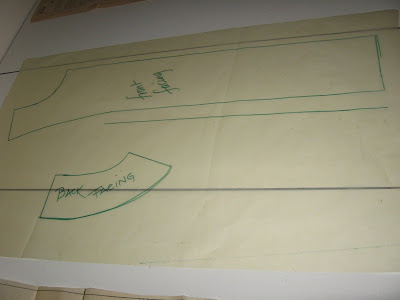
The bottom third of the jacket was cut at the pattern waistline which was marked on the original jacket pattern piece. Again I added a 5/8" seam allowance to both cut pieces. (The picture above shows my first attempt at cutting the pattern apart. Because it wasn't working, I then added the vintage pattern to the top and recut the pattern!)
To make the openings, I again used the vintage pattern pieces laid on top of my now cut apart jacket fronts. Using the markings on the vintage piece, I transferred them to my new pattern pieces with a sharpie marker to make dots. Once the dots were on my pieces, I made larger X's so that I would clearly know where to stop and start the seams.
I also drafted new front and back neck facings since my TNT pattern does not include them. I did this by just laying some tracing paper on top of the original uncut pattern and drawing out the facing. I made sure that I measured the same amount on the front facing piece as the back neck facing shoulder seams...so the pieces would fit together easily when sewn. This was done to copy the look of the vintage jacket.
2. Construction
I followed the instructions in the vintage pattern step-by-step.

a. First the darts were sewn in the middle section.
b. Then the top section and the middle section were sewn, right sides together, leaving the sections at the x's open. I reversed stitched to make sure that the opening seam edges were secure. Then pressed the seam open.
c. I followed the same steps listed above to sew the bottom piece to the top piece.
d. Since I wanted my underlays to be the same as my lining and tank top fabric, I used the pattern piece from the vintage pattern. 4 underlays were cut using my Gingher pinking shears.

e. Then on the inside of the front piece, I pinned the right side of the underlay to the wrong side of the jacket, over the opening in the seam. Then the underlay was basted into place. This was repeated on all of the pieces.

f. Next I topstitched the opening edges through all the thicknesses. I used my foot as a guide to get a well stitched pocket. Isn't it kewl how just a little of the lining fabric peeks through the pocket!

 And that was it! A little pattern work, a little precision and faux welt pockets! I love this look and want to make another suit from a midweight linen for spring/summer using this same technique. Maybe a black linen with white stitching and a black/white polka dot lining!
 I've already done a post showing you the interior workings of the jacket. So my next post will be about the sleeves. And then a picture of me wearing the outfit!
I have to admit that before reading Shannon and Summerset's posts about their love of vintage patterns, I never really paid much attention to them. Once Summerset started to show the instruction sheets and wrote about the detailed construction tips, I became intrigued. I was hooked when I bought my first vintage pattern from Lanetz Living and got my hands on an instruction sheet.
Now I troll the site looking for patterns with interesting construction details. It is not necessary for the pattern to fit me. It is more important to see what new techniques I can learn. And that is what this project and this jacket was all about - learning a new technique! It was a very easy process and gave a tremendous bang for the buck! The jacket also is envogue but different from what everyone else was dialing up at church on Easter Sunday and in my workplace. The pattern and instruction sheet are worth way more than the $3 I paid for it!!! And I encourage everyone to purchase at least one vintage pattern...you may be surprised at what you find inside!